In this document I’ll show how easy it is to create a Virtual Private Cloud (VPC) and setup the infrastructure to support a basic two-tier application in Amazon Web Services (AWS), currently one of the most popular cloud-provider on the market. For small businesses “lifting and shifing” systems from on-premise to the cloud should be a fairly straightforward task.
Network Topology Diagram

Addressing Table
VPC CIDR Block: 10.0.0.0/16
| Public Subnet 1a | 10.0.1.0/24 |
| Public Subnet 1b | 10.0.2.0/24 |
| Private Subnet 1a | 10.0.3.0/24 |
| Private Subnet 1b | 10.0.4.0/24 |
Note: Public subnet servers may be assigned public IPv4 addresses picked at random from AWS IP Address pool. Compute resources in Public and Private subnets will automatically get static Private IP addresses. The Application Load Balancer will be assigned an IP Address by AWS and all the traffic will be directed towards it keeping the servers out of reach from the general public.
AWS Virtual Private Cloud (VPC) Creation
A VPC is a segregated virtual private cloud that can be used to host various services and networks. It closely resembles a traditional network that can be configured in on-premises infrastructure. A VPC may contain services such as Subnets, Route table, Internet gateway, VPC endpoint and CIDR blocks.
Stated below steps were used in creation of the Virtual Private Cloud (VPC)
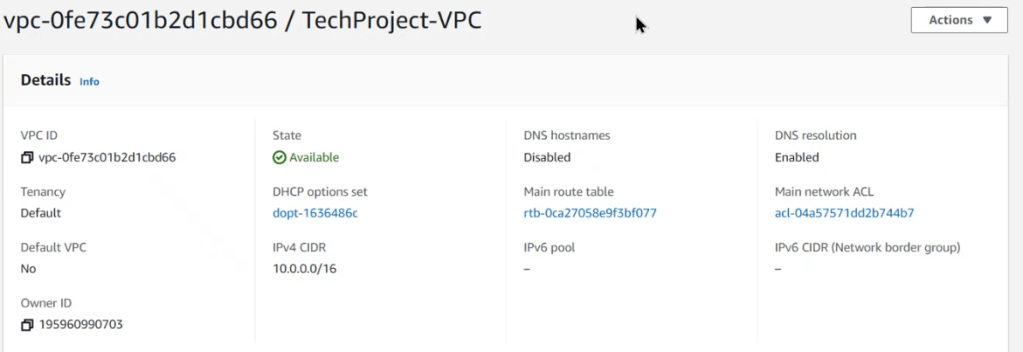
Navigate to VPC under AWS management console and click on Create VPC
- Input VPC name- TechProject-VPC
- Input IPv4 CIDR block- 10.0.0.0/16
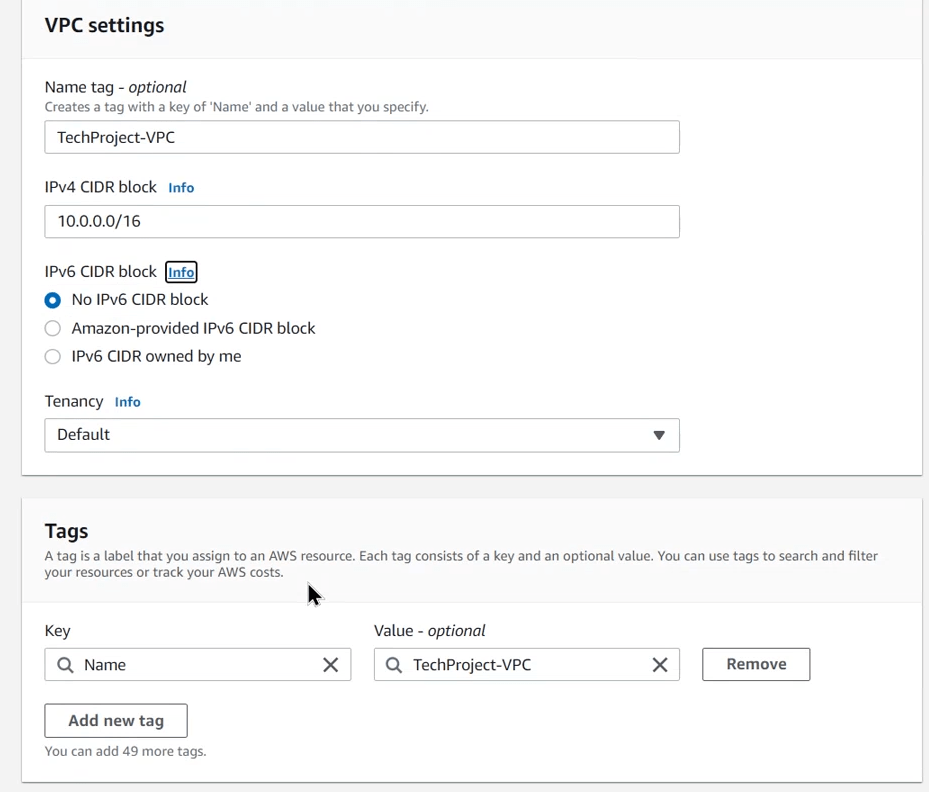
- Set the Tags
- Click Create VPC
- Review the details and create VPC
Subnet Creation
Each VPC must be specified at an IPV4 address range in the form of Classless Inter-Domain Routing (CIDR) block. Optionally, IPv6 CIDR blocks can be assigned to the VPC. Each subnet must be associated with a route table, which determines how the network traffic will propagate. The rules for outbound or inbound traffic can be set on the route table.
Once the custom AWS VPC has been created after assigning an appropriate CIDR block and configurations, subnet creation will follow with the stated below steps.
- Navigate to the Subnets using the AWS management console under VPC and click on Create Subnet
- Select the VPC ID under custom and choose TechProject-VPC
- Set the Subnet Name as Publicsubnet with CIDR block 10.0.1.0/24-us-east-1a
- Set the Availability Zone as us-east-1a
- Set the IPv4 CIDR block as 10.0.1.0/24 for this Public Subnet
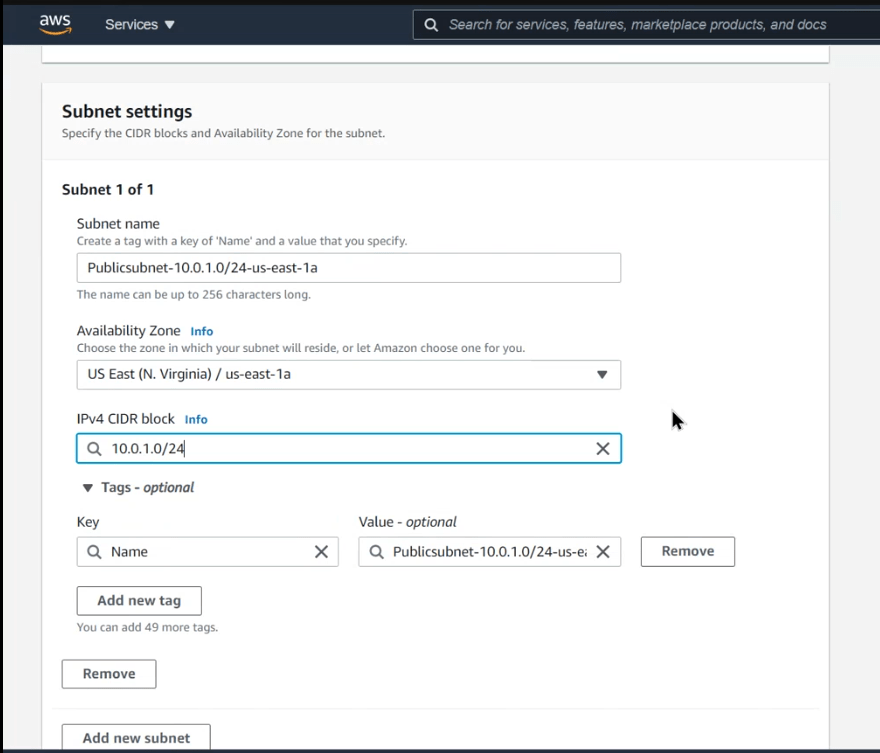
Create second subnet 10.0.2.0/24
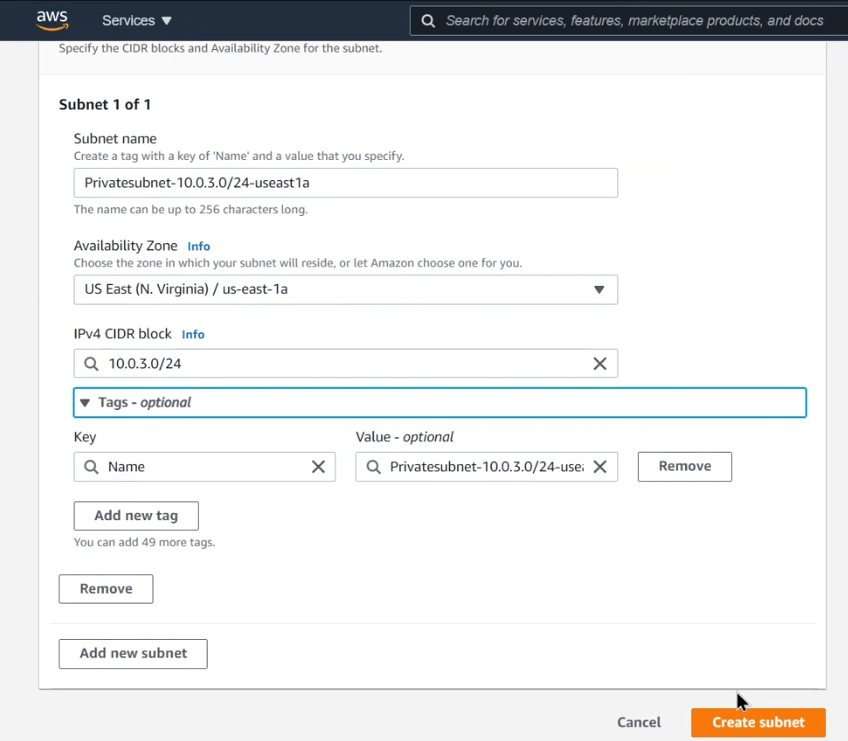
- Create private subnet
- Subnet name- Privatesubnet-10.0.3.0/24-us-east-1a
- Availability Zone- eu-east-1a
- IPv4 CIDR- 10.0.3.0/24
- Click create subnet
Create second private subnet
2 Private and 2 Public subnets have been configured.
Create Route Table
A route table contains a set of rules, called routes, that are used to determine where network traffic from the subnet or gateway is directed. The main route table controls the routing for all subnets that are not explicitly associated with any other route table. The internet gateway can be attached to the route table to provide internet access to specific networks.
To create a route table, navigate to Route Tables and click on Create route table
- Name tag- PublicRoute
- VPC- Custom (TechProject-VPC)
- Click create

Attach internet gateway
An internet gateway is a horizontally scaled, redundant, and highly available VPC component which enables internet access for the specified networks within the route table. To allow internet access, the instance must have a public IPv4 address or an Elastic IP address that’s associated with a private IPv4 address on the instance.
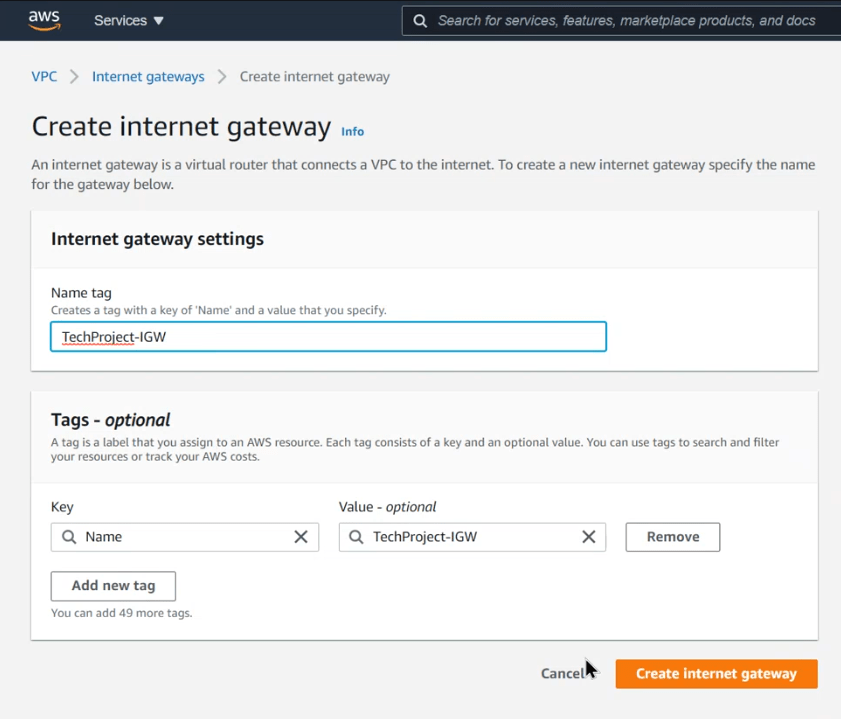
To attach the internet gateway to the route table, navigate to Internet Gateways under VPC and click on Create internet gateway
- Name tag- TechProject-IGW
- Click create internet gateway
Attach VPC to Internet Gateway
Attaching the VPC to the internet gateway provides internet access to the networks within the VPC.
To attach the VPC to the Internet Gateway, navigate to Internet gateways under VPC and click on Attach to VPC
- Available VPC- Custom (TechProject-VPC)
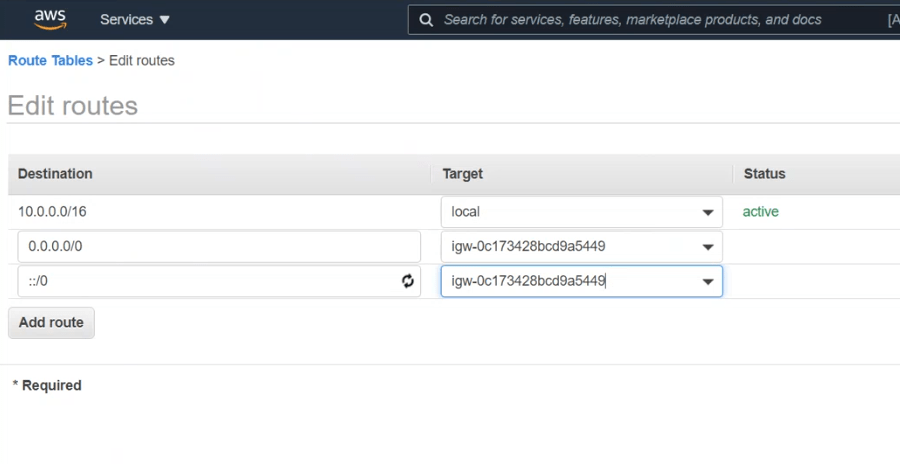
Edit Route by following following guidelines
- Route Tables > Edit routes
- Add route #1- 0.0.0.0/0
- Target- Custom IGW (TechProject-IGW)
- Add route #2- ::/0
- Target- Custom IGW (TechProject-IGW)
Configure Network Access Lists ACLs
A Network Access Control list acts as an additional layer of security between the network traffic outside the enterprise and internal network. It provides functionality similar to a firewall by restricting inbound and outbound traffic based on the rules set by the administrator.
Configure the Network Access Lists by navigating to Network ACLs under VPC and clock on Create network ACL
- Name- WebACL
- VPC- Custom (TechProject-VPC)

Edit inbound rules
Inbound rules monitor the traffic entering the network from outside the VPC. The rules can be set to either block specific ports, ip address ranges or networks. Based on the rules set, the ACL will block or allow the network to propagate through the network.
To configure the inbound rules, navigate to the following path VPC > Network ACLs > WebACL > Edit inbound rules
- Add new tule-
- Rule number- 100
- Type- SSH
- (add more rules as required)
Edit the same ACLs for outbound rules.
Once the VPC has been created with listed below components in it, compute resources within the AWS environment would then be created.
– 4 Subnets (2 Public and 2 Private)
– 2 Network Access Control Lists (1 Public and 1 Private)
– 2 Routing Tables (1 Public and 1 Private)
– 1 Internet Gateway
Creation of Compute, Storage and Networking Resources in AWS
The compute, storage and networking resources will include:
- Linux Web Servers
- Relational Databases
- Load Balancer
EC2 Linux Instance and Security Group setup
The first compute resource that will be created in the public subnet in an AWS hosted VPC will be an Elastic Cloud Compute (EC2) machine. Steps to spin up a web server on a public subnet hosted on availability zone US East 1a using an Linux EC2 machine are listed below.
- Go to the compute resources and select EC2 from AWS management console
- Choose Amazon EC2 Linux and select t2.micro as the instance type
- Select the subnet and availability zone
- Set suitable tags to identify your webserver
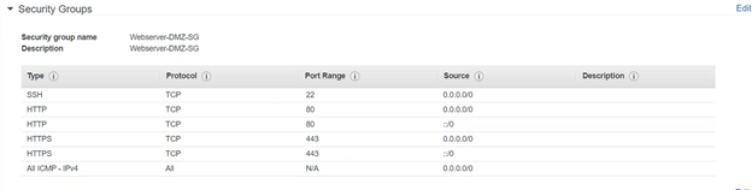
- In the security page, create a new security group with 443 (HTTPS) and 80 (HTTP) open to general traffic on IPv4 and IPv6 (SSH ports are open to test the connectivity and should be removed from the DMZ security group once testing and installation of PHP is done)
- Select the necessary amount of storage required
- Create a new key pair and download it in a safe place (this will be used to access the EC2 machine)
- Review and launch the EC2 Linux machine
EC2 Linux Instance Connectivity
Once the Linux EC2 machine is in the running state, connectivity to it must be tested. A putty session will be used to connect with the Linux EC2 instance using SSH. Steps below can be followed to connect to the EC2 machine using putty.
- Open Puttygen and convert the .pem file downloaded from AWS management console to a .ppk file with the same file name as an RSA key.
- Open the Putty Session and choose port 22 for SSH
- Use the syntax “ec2-user@ec2[private ip address].compute-1.amazonaws.com
- Expand the SSH section in the left pane and select AUTH. Browse the .ppk key file previously created by puttygen
- Click open to launch an SSH session with AWS EC2 Linux instance
Installing WordPress on Linux EC2 as a Webserver
Once the SSH session is successful on the Linux EC2 instance, setting it up to act as a webserver can be done using the following commands
- Run updates on Linux
yum update -y
- Install PHP and all the necessary dependencies to avoid version mismatches
yum install httpd php php-mysql -y
amazon-linux-extras install php7.4
- Create a health check file named as healthy.html in html directory
cd /var/www/html
echo “healthy” > healthy.html
- Get, install and change permissions on WordPress files
wget https://wordpress.org/wordpress-5.1.1.tar.gz
tar -xzf wordpress-5.1.1.tar.gz
cp -r wordpress/* /var/www/html/
rm -rf wordpress
rm -rf wordpress-5.1.1.tar.gz
chmod -R 755 wp-content
chown -R apache:apache wp-content
wget https://s3.amazonaws.com/bucketforwordpresslab-donotdelete/htaccess.txt
mv htaccess.txt .htaccess
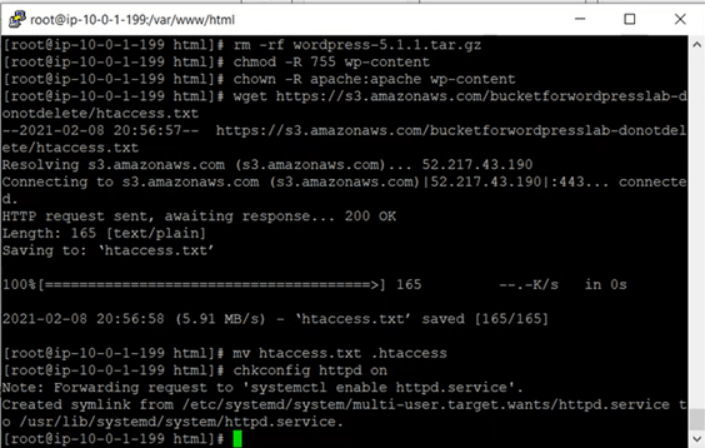
- Check the configuration on Apache
chkconfig httpd on
- Start the Apache
service httpd start
- Check the Apache service status
service httpd status

Once the above listed steps have been done, test the connectivity by copying the Public IP address of the Linux Webserver and launching it in the web browser. If the user can see the WordPress configuration and setup page, the installation has been successful.

Setting up and Launching a MySQL Relational Database
In order to setup and launch a MySQL RDS database following steps were followed to create the solution.
1. Select the RDS from AWS management console
2. Choose a Standard Database and select MySQL
3. Choose a Production environment for the database
4. Assign a master username and password for the database
5. Choose a database instance size. T2.micro instance size and class was chosen for this solution.
6. Set up subnet groups in RDS console and then set up the connectivity settings
7. Restrict Public access to the Database and use a new security group
8. Use MySQL database port 3306
Once the MySQL Database is configured, edit the security group created above in step 7.
9. Choose Compute services from AWS management console.
10. Select Security Groups from the left pane section.
11. Select the RDS security group and click Edit Inbound Rules.
12. Use MySQL/Aurora as Type, TCP as Protocol, 3306 as Port Range and use the Security Group of the webserver created in the previous steps as a Custom Source.
13. Click on Save Rules.
Configuring the WordPress Site
Stated below steps are used to configure the WordPress on webserver.
1. Launch the Public IPv4 address of the webserver in the web browser to configure the WordPress
2. Click Let’s Go
3. Copy the configuration source code provided and create a new file in the /var/www/html directory and name it wp-config.php
4. Paste the copied configuration script in the wp-config.php and save

5. Click Run Installation on the WordPress in browser
6. Fill all the fields using the credentials used to set up the MySQL Database (RDS)
7. Create a new post on WordPress and test it by launching the Post URL Address in the browser
Create an Amazon Machine Image (AMI) of the Web Server
Use the following steps to create an image of the webserver to place it in the autoscaling groups
1. Select the Webserver instance in the EC2 management console
2. Click Actions, select Image and Templates and then click Create Image

3. Set the Image name and description.
4. Click Create Image.
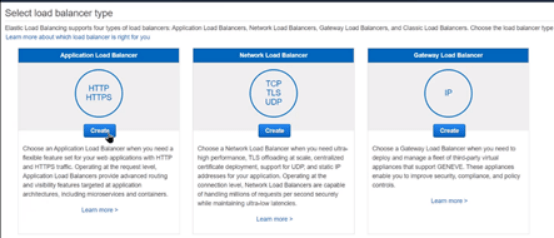
Creation of Application Load Balancer
Create the Application Load Balancer using the following steps.
1. Click on Load balancers in the left pane section.
2. Click on Create Load Balancers.
3. Use an Application Load Balancer from given options.
4. Set the load balancer to be Internet Facing on port 80 (HTTP) as listener.
5. Select the VPC and subnets from the Availability Zones.
6. Configure the Security Groups by selecting the Webserver’s security group created in previous steps.
7. Create a Target Group and set the target type as instance listening on port 80 (HTTP).
8. In the Health Checks section use HTTP as protocol and use the path /var/www/html/healthy.html for health checks.
9. Set the thresholds for health checks on webserver.
10. Register the targets with load balancer.
11. Review and Create.
Creation of Auto Scaling Groups
Stated below steps were used to create the AutoScaling Groups
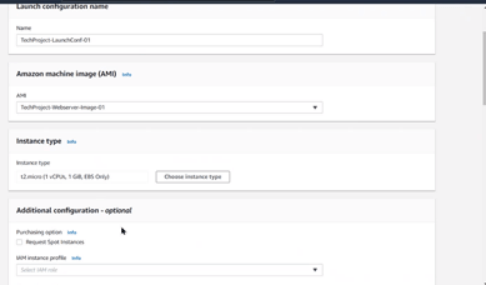
1. Under the EC2 management console navigate to Auto Scaling and then click on Launch Configurations from the left selection pane.
2. Click on Create Configuration.
3. Set the Launch Configuration Name.
4. Select the AMI created in the previous steps.
5. Choose the selected instance type and size.
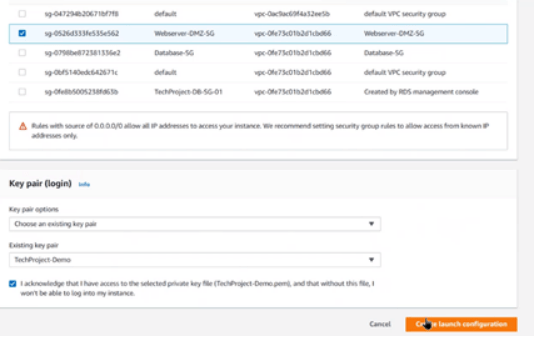
6. Select the existing webserver Security Group
7. Choose a Key Pair and click Create Launch Configuration
8. Select Auto Scaling Groups from the left selection pane under Auto Scaling.
9. Click on Create Auto Scaling Groups
10. Set the template name and then Switch to Launch Configuration and use the launch configuration template.

11. In the Network settings select the VPC and choose the public subnets 1a and 1b
12. Attach an existing Load Balancer and Target Group.
13. Set the Health check periods.
14. Set the Target Scaling policy as 50% of the CPU utilization for scaling action.
15. Create a Simple Notification Service (SNS) topic and subscription by setting email address as recipients.
16. Create the Auto Scaling Groups.
Testing
The testing phase of the solution was conducted by installing a utility on the Linux Webserver called ‘Stress’ after gaining access to it on port 22 using SSH. This utility tool was installed to max out the webserver’s CPU for a specific amount of time till the Cloud Watch Alarm gets triggered to launch a new Webserver using the configurations defined in Auto Scaling Group.

Once the utility is successfully installed, run the program ‘Stress’ for 5 minutes or 300 seconds for 1 CPU and use the command ‘top’ in a duplicate session to monitor the CPU usage real time.

The Detailed Monitoring metric on Webserver will detect that the webserver is maxing out on CPU usage and is unhealthy, this will trigger the Auto Scaling group to automatically spin up a new webserver in a different availability zone.

This launch of a new webserver could be verified in the Auto Scaling Groups console under the ‘Activity’ section by matching the instance ID’s.
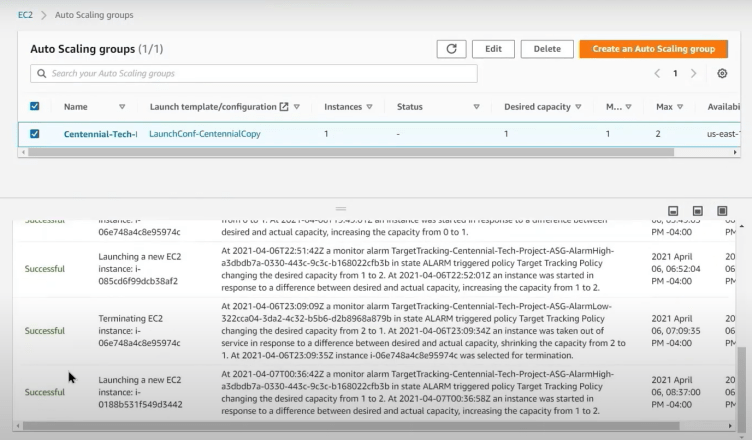
The application Load Balancer will automatically start sending the web traffic to the new webserver in availability zone b and stop sending the traffic that is maxing out its CPU. The Auto Scaling group will then scale in once the CPU max out session stops by terminating the oldest running webserver/instance.